

[SHADOW=1]Lesson 16: Magic Wand Tool
[/SHADOW]


[SHADOW=1]
Asalam-o-alaikum Wrwb aajka humara lesson hain about magic wand tool so bena kuch zyada kahe let's start the lesson which took too much time for completing.
[/SHADOW]
[/SHADOW]
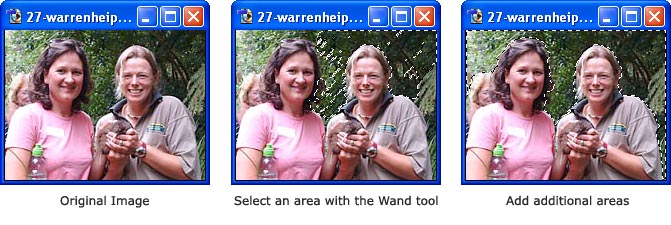
Magic Wand Tool: yeh tool bhi Selection se related hain jho k image k ek exact area ki selection allow kerta hain, means similar color k bases pe selection kerti hai, for example:
aap image k ek area ko jho red color ki ho magic wand tool k zerye selection kerte hain tu voh automatically image mei jaha kahe bhi jho red color ho usko select kerti hain aur ager ek image ka pura he ek background serf ek he color ki ho and just us mei kessi ka photo ho tu the same voh serf backhground ki color ko select kerti hain sewae image then aap chaho tu background color change bhi kersakte hain ya koi aur image us mei set kersakte hain.
below degaye hue examples mei apko khulasa kerte hain
Example 1: how to remove background of an image and make it transparent...
Humare paas image hain jeske white background hain and hum usay selection ker k remove kerna chahte hain,

so Magic Wand Tool pe click kare
and then image k background pe click ker k Selection kare,

jho kuch aisa dekhega, Now see the option bar jaha pe Tolerance k kum hune k wajah se image k edges clearly select nahin hue so kio k aap higher selection kerna chahte hain, tu eslie tolerance mei aapko number increase kerne honge jho 255 tuk kersakte hain,
abhi 100 kerdi hain tu tolerance k zyada amount hune k wajah se khud image k white area's jho es girl ki face bhi hain voh bhi selection mei agaye,

so I think 50 or maybe 60 is fine.
pir image pe selection kare jho k kuch es terha selection hugi means pura ka pura background,

(Jub bhi aap aise background ko selection kare then aap image ko thora zoom in kare and image mei jho koi particular item huti hain unke borders ache se selection hue ya nai voh zoom in ker k dekhegi kio jub aap esay image ko pir copy+paste karenge dusre image pe tu eske edges mei white effects rah jaate hain jessay aap ne clear selection na ki hu so eslie yeh hamesha yaad rakhe as a tip from my side k jub bhi selection kerna hain tu image ko khob zoom in ker k select kare)
tu ab aap layer palettes pe ek nazar kare and waha pe layer k paas lock ka mark huga, So us layer pe double Click ker k unlock kare


and then Delete button ko press kare jes mei apka background delete huker transparent hujayegi.
(ager double click ker k unlock nahin karenge pir transparent background nahin hugi balke jho tool box mei background color hugi voh aapke image ki background ban jayegi)

pir aap select All (Ctrl+A) kare

and then copy kare and koi aur image mei aap usay paste kerna chahte hai, something Like I have selected this image
then us mei paste kare jho k aapka image kuch aisa dekhega.

yaha pe jub dehan jaye tu paste ki hue images k jho borders hain us mei selection effects baki hain,

so usay aap clear ya soften kersakte hain Blur k saath,so tool box mei he Blur ko select kare,

and brush ko medium size mei le and Strenght mei 51 tuk k value rakhe and images k jes areas mei aapko effects dekh rahe hain usay zoom in ker k blur kare.

and pir wapas zoom out kare and see the changes.

ab es mei ek aur effect bhi baki hain k image ka color background k saath matching ho so aap image>>Adjustment>>Level... pe click kare

and level slider k zerye aap eske brightness badha de,
usay up side mei move kerne se jho input level mei 1.70 ki value hujayegi

jho aapke pic and image ka background same dekhe
and yeh level tool optional hain aap chaho tu use kero nai tu nahin yaha per kio k mai aapnay image ko set kerna chahte tu eslie esay use kiya so yeh tha just one example of this tool.
Example 2: es example mei hum aapko khud image k background mei selection ker k dusre image ko paste karenge jho k pahlay example k belkul against hain.

yeh hain humara image eske background ko hum magic wand tool k zerye select kerte hain,

and dusre image ko copy ker k pir es image per Shift+Ctrl+V jho backhgroud mei paste kerne ka shortcut key hain paste kerte hain and voh image kuch aisa paste hoga.

and thats it, tu ager image se koi pic ko copy ker k dusre image mei paste kerna hain so uske lie example number 1 ko apply kare, aur ager khud image k pic ki background mei koi dusre image ko exchange kerni hain so apply this 2nd example.
I hope it helped you ab athe hain magic wand tool k option bar mei the same Marquee Selections k terha yaha bhi 4 boxes hain and enka kaam same jho us tools mei the yaha bhi hai.
New Selection Box:

Aam taur per serf ek he baar selection kerti hain chahe us mei kitne he image portion kio he include na ho, jub yeh button click hota hain tu serf ek baar courser button k click kerne se selection huti hain.

Add to Selection Box:

aapke esay new selection ko increase kerne mei madad kerte hain ager voh kessi ek area k portion ko select kerti hain tu yeh baki area k selection ko increase kerte hain jitna aap chaho.

Subtract Selection Box:

Add to selection k against kaam kerta hain means selection ko decrease kerte hain jes portions mei ager zyada selection hue ho and aap us selections ko kum kerna chahte hain then es box pe click ker k selection kum kare.

Intersect Selection Box:

same intersect kerta hain jeska es images mei aapko work ka pata chalega and yeh koi khaas kaam ka itna nai hota.

Magic wand tool k Option bar mei 4 options hain.
1- Tolerance
2- Anti Aliased
3- Contiguous
4- Use All Layers
1- Tolerance:Tolerance value (0 se 255 tuk) hote hain. and tolerance k zerye aap zyada se zyada ek color k mutabik aur matching colors ko Select kersakte hain jesske zerye higher tolerance means a larger selection jho k 255 k kareeb k amounts hote hain selection ker sakte hain. zyada amount likhne se aapke same color k smilier zyada selection hugi and kum amount likhne se halki seelction hugi.

2- Anti Aliased: esay tick mark kerne se aapke selection ki edges smoothly select honge.


3- Contiguous: es se serf vohi areas select hote hain jenke colors matching serf ek portion tuk image mei joined ho.
ager tick mark na ho tu zyada areas ko jho similar color k ho selection kerti hain otherwsie least selection method k lie yeh tick mark kiya jata hain.


4- Use All Layers: (ko tick mark kerne se)ager aapke image mei ek se zyada layers ho tu sabhe layers ko ek image k terha general selection kerti hain aur ager yeh tick mark na ho so jho layer aapke layer palette mei maujood hain serf usay one click mei selection kerti hain baki layers k lie pir uske layer mei click kerne se wand selection hugi.


so Thats All about Magic Wand Tool jho k ek useful tool hain I know aap loug itne screenshots dekh ker thore confuse hue honge but yeh sab aap logu k asani k lie her ek step ko one by one define kerne k lie zyada se zyada shots liye ta k koi mushkil na ho Still aap logu ko thora confusion tu hugi he so Plzz dont hesitate tu ask and practicle es tool ko zaroor try kare and then let me know k kaisa tha.
aap image k ek area ko jho red color ki ho magic wand tool k zerye selection kerte hain tu voh automatically image mei jaha kahe bhi jho red color ho usko select kerti hain aur ager ek image ka pura he ek background serf ek he color ki ho and just us mei kessi ka photo ho tu the same voh serf backhground ki color ko select kerti hain sewae image then aap chaho tu background color change bhi kersakte hain ya koi aur image us mei set kersakte hain.
below degaye hue examples mei apko khulasa kerte hain
Example 1: how to remove background of an image and make it transparent...
Humare paas image hain jeske white background hain and hum usay selection ker k remove kerna chahte hain,
so Magic Wand Tool pe click kare
and then image k background pe click ker k Selection kare,
jho kuch aisa dekhega, Now see the option bar jaha pe Tolerance k kum hune k wajah se image k edges clearly select nahin hue so kio k aap higher selection kerna chahte hain, tu eslie tolerance mei aapko number increase kerne honge jho 255 tuk kersakte hain,
abhi 100 kerdi hain tu tolerance k zyada amount hune k wajah se khud image k white area's jho es girl ki face bhi hain voh bhi selection mei agaye,
so I think 50 or maybe 60 is fine.
pir image pe selection kare jho k kuch es terha selection hugi means pura ka pura background,
(Jub bhi aap aise background ko selection kare then aap image ko thora zoom in kare and image mei jho koi particular item huti hain unke borders ache se selection hue ya nai voh zoom in ker k dekhegi kio jub aap esay image ko pir copy+paste karenge dusre image pe tu eske edges mei white effects rah jaate hain jessay aap ne clear selection na ki hu so eslie yeh hamesha yaad rakhe as a tip from my side k jub bhi selection kerna hain tu image ko khob zoom in ker k select kare)
tu ab aap layer palettes pe ek nazar kare and waha pe layer k paas lock ka mark huga, So us layer pe double Click ker k unlock kare
and then Delete button ko press kare jes mei apka background delete huker transparent hujayegi.
(ager double click ker k unlock nahin karenge pir transparent background nahin hugi balke jho tool box mei background color hugi voh aapke image ki background ban jayegi)
pir aap select All (Ctrl+A) kare
and then copy kare and koi aur image mei aap usay paste kerna chahte hai, something Like I have selected this image
then us mei paste kare jho k aapka image kuch aisa dekhega.
yaha pe jub dehan jaye tu paste ki hue images k jho borders hain us mei selection effects baki hain,
so usay aap clear ya soften kersakte hain Blur k saath,so tool box mei he Blur ko select kare,
and brush ko medium size mei le and Strenght mei 51 tuk k value rakhe and images k jes areas mei aapko effects dekh rahe hain usay zoom in ker k blur kare.
and pir wapas zoom out kare and see the changes.
ab es mei ek aur effect bhi baki hain k image ka color background k saath matching ho so aap image>>Adjustment>>Level... pe click kare
and level slider k zerye aap eske brightness badha de,
usay up side mei move kerne se jho input level mei 1.70 ki value hujayegi
jho aapke pic and image ka background same dekhe
and yeh level tool optional hain aap chaho tu use kero nai tu nahin yaha per kio k mai aapnay image ko set kerna chahte tu eslie esay use kiya so yeh tha just one example of this tool.
Example 2: es example mei hum aapko khud image k background mei selection ker k dusre image ko paste karenge jho k pahlay example k belkul against hain.
yeh hain humara image eske background ko hum magic wand tool k zerye select kerte hain,
and dusre image ko copy ker k pir es image per Shift+Ctrl+V jho backhgroud mei paste kerne ka shortcut key hain paste kerte hain and voh image kuch aisa paste hoga.
and thats it, tu ager image se koi pic ko copy ker k dusre image mei paste kerna hain so uske lie example number 1 ko apply kare, aur ager khud image k pic ki background mei koi dusre image ko exchange kerni hain so apply this 2nd example.
I hope it helped you ab athe hain magic wand tool k option bar mei the same Marquee Selections k terha yaha bhi 4 boxes hain and enka kaam same jho us tools mei the yaha bhi hai.
New Selection Box:
Aam taur per serf ek he baar selection kerti hain chahe us mei kitne he image portion kio he include na ho, jub yeh button click hota hain tu serf ek baar courser button k click kerne se selection huti hain.
Add to Selection Box:
aapke esay new selection ko increase kerne mei madad kerte hain ager voh kessi ek area k portion ko select kerti hain tu yeh baki area k selection ko increase kerte hain jitna aap chaho.
Subtract Selection Box:
Add to selection k against kaam kerta hain means selection ko decrease kerte hain jes portions mei ager zyada selection hue ho and aap us selections ko kum kerna chahte hain then es box pe click ker k selection kum kare.
Intersect Selection Box:
same intersect kerta hain jeska es images mei aapko work ka pata chalega and yeh koi khaas kaam ka itna nai hota.
Magic wand tool k Option bar mei 4 options hain.
1- Tolerance
2- Anti Aliased
3- Contiguous
4- Use All Layers
1- Tolerance:Tolerance value (0 se 255 tuk) hote hain. and tolerance k zerye aap zyada se zyada ek color k mutabik aur matching colors ko Select kersakte hain jesske zerye higher tolerance means a larger selection jho k 255 k kareeb k amounts hote hain selection ker sakte hain. zyada amount likhne se aapke same color k smilier zyada selection hugi and kum amount likhne se halki seelction hugi.
2- Anti Aliased: esay tick mark kerne se aapke selection ki edges smoothly select honge.
3- Contiguous: es se serf vohi areas select hote hain jenke colors matching serf ek portion tuk image mei joined ho.
ager tick mark na ho tu zyada areas ko jho similar color k ho selection kerti hain otherwsie least selection method k lie yeh tick mark kiya jata hain.
4- Use All Layers: (ko tick mark kerne se)ager aapke image mei ek se zyada layers ho tu sabhe layers ko ek image k terha general selection kerti hain aur ager yeh tick mark na ho so jho layer aapke layer palette mei maujood hain serf usay one click mei selection kerti hain baki layers k lie pir uske layer mei click kerne se wand selection hugi.
so Thats All about Magic Wand Tool jho k ek useful tool hain I know aap loug itne screenshots dekh ker thore confuse hue honge but yeh sab aap logu k asani k lie her ek step ko one by one define kerne k lie zyada se zyada shots liye ta k koi mushkil na ho Still aap logu ko thora confusion tu hugi he so Plzz dont hesitate tu ask and practicle es tool ko zaroor try kare and then let me know k kaisa tha.


} {(confuse)}")

")